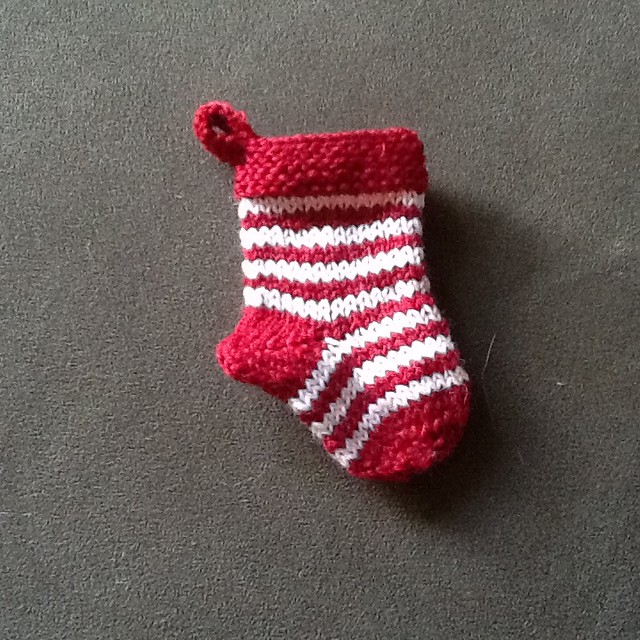
Monday, October 7, 2013

Weensy Ornament

Eegads it's been a time since I last updated! So here! Have a gift! This is a wee stocking that I just wanted to see come to life. I'm working on piling up the gifts before it's "crunch time"! This was so simple that I thought to share it with the world:

So wee!
I used Cascade Heritage Sock Yarn in "white" and "red", negligible amounts of each really.
I had size 1 (2.25mm) circular needle with which to use magic loop! (so if you are using dpns, keep that in mind as you read directions)
It might have helped to have two stitch markers (for working short row heels) but I was "winging it" and didn't have them...
Finished size: about 2 inches across the leg and about 3.5" from toe to cuff.

Things I assume you already know how to do: Judy's magic cast on (Google it!) knit stockinette and garter in the round, work a basic short row (wrap and turn) and how to work a wrap with it's stitch, work a kfb increase, and bind off.

Let's begin!
Using Judy's magic cast on and the color you want for the toe, put 6 sts on your needles, ready to work in the round. Immediately increase all sts using kfb, now there's 12.
Knit one round.
Work *k1, kfb. Repeat from * to the end of the round. 18 sts
Knit one round.
Work *k2, kfb. Repeat from * to the end of the round. 24 sts
Knit one round
Work *k3, kfb. Repeat from * to the end of the round. 30 sts
Knit one round.
Switch to your stripe color and work two rounds of the new color. Now alternate colors, two rounds of each until you have 5 stripes after the toe. You should be ready for a stripe in the toe-color now. And it's time for the heel...
Knit 22, wrap and turn, purl 15, wrap and turn.
Knit 14, wrap and turn, purl 13, wrap and turn.
Knit 12, wrap and turn, purl 11, wrap and turn.
Knit 10, wrap and turn, purl 9, wrap and turn.
Knit 8, wrap and turn, purl 7, wrap and turn.
Knit 6, wrap and turn, purl 5, wrap and turn. Now we work the other half...
From now on, when you come across a stitch that was wrapped, work it with it's wrap(s).
Knit 6, on next stitch add a second wrap, turn (all wrapping will be on a pre-wrapped st now)
Purl 7, wrap and turn.
Knit 8, wrap and turn, purl 9, wrap and turn.
Knit 10, wrap and turn, purl 11, wrap and turn.
Knit 12, wrap and turn, purl 13, wrap and turn.
Knit 14, wrap and turn, purl 15, wrap and turn.
Now knit to the end of the round, and work one more full round of this color. Heel is done!
Return to the stripe routine you had before until you have 7 stripes AFTER the heel.
Starting with a knit round (you should now be using the toe color again), work garter stitch until you have 4 purl ridges. Knit half the sts plus 2, then begin binding off all the sts until you only have 4 left on the needles (total). This will be your hanging-tab. Start knitting this tab in garter stitch back and forth until you have a little more than an inch (whatever you think you will need for hanging the stocking or attaching it to something else). Now you can either bind off the 4 sts and sew it to the inside of the sock, or bind it off together with sts you pick up from a purl ridge... which ever makes you happy.

If you wanted to get crazy, you could probably make one using the same directions, with DK yarn and appropriately-sized needles and get something that might hold a gift card? I haven't tried it yet, but let me know if you do!

Enjoy!

Tuesday, June 26, 2012

Happy Cast Day!

Just FYI that's red, not pink... Mom isn't all that great at color balancing!

Today was the "exciting" day of cast-application! After the initial upset about having to get a full arm cast instead of just the short cast, it went well enough all things considered! Four weeks of this and then hopefully it will be ready to come off (in time for birthday parties and stuff!!) Wish us luck that we can keep this sucker dry... with the way the weather has been lately, the pool is the least of our worries.

Anyone want to come autograph it?? :D

Friday, May 25, 2012

Amber Huntin' in the U.S.A.

Today was a great day for amber hunting in the PNW! After a full week of springtime raining, it cleared up for us today and we had a lovely field trip with the Little Man's class.

The hike was about a mile and a half through an absolutely gorgeous forest where once a coal mine existed (and blew up) a smidge over 100 years ago. Now it's a State Forest, and a nice place to hunt for amber and fossils (if you have a permit to do so... please don't go ripping up the ground in the area without asking!)

This is Geologist Bob, who was a consulting Geologist for many years before retiring and starting his much more important career of teaching 3rd graders about Geology! :D He is a very interesting person, and of course very knowledgeable... and great with kids!

Little Man had to pose for a shot on the trail ;)

One of many pictures of the Amber-hunting-grounds. I had to show the muddiness (and L.M.s proximity to said-mud) and the steepness. It was quite an ankle-twister but we all managed to find a spot to plunk down and search. Because of the recent rains, there was already a lot of amber and Jet on the top! Just had to look for the sparkles and then pick it up!

Here's my lovely wee pieces

I don't have any pics of the fossil-hunting part because I was one of the adults assigned a hammer. I felt like Thor a little bit with a bunch of kids bringing me shale to pound on and see if there was anything fossil-ey inside! Mostly we found Meta Sequoia needles, but supposedly if you are lucky you can find a clam fossil! We all tried very hard but it was all about the ancient sequoias. L.M. Found a cedar though! It's nice to be a little different ;)
 The black squiggle in the middle there is the cedar needle

Here's the Jet and Amber I carried for the class collection. I wanted to take it home and wash it off a bit. You can kind of see how different the colors can be in the amber, we had kids finding yellow, orange, red and BLUE amber (I had no idea there was such a thing as blue amber).
All in all it was a very pleasant day and I am so grateful that our class was able to do this! Thanks to everyone involved in making it happen!!

Monday, January 16, 2012

Owls and Anatomy

The Little Man is covering the Human Skeleton in school for science these days. Always a cool subject in my book... however one day this week he missed school, and the highlight of that was we got to bring home some science homework!!!

I give you Owl Pellet dissection 101:
First you observe the pellet in it's wholeness ("hard and very rough... and brown" were the decided upon adjectives... I thought those were well chosen).


Then you start to take it apart.


 Delicacy is key here, the contents of the pellet are very fragile!


Then at some point, Mom remembers the forgotten digital microscope he got for Xmas a few years back! Go Mom!


Wow Mom, homework is fun! (Which is what I was thinking in my head while I was taking the picture... he never actually said that, but you can keep a secret, right?)


Picture of the still-very-hairy mouse bone:


The full assortment we excavated from the furry mass:


Found: one jaw bone, a couple of vertebrae, definite femur and tibia... and a few things we had to assume were some radius/ulna. We also think we found a scapula, but it was really hard to tell.

Then he identified and placed the bones and taped them on the paper. Nice work Dude!


Can any of you remember 3rd grade homework that was so cool?? I sure don't!

Friday, November 18, 2011

Zen Nettles

I find the movements of jellyfish to be very meditative and relaxing... so when I had an opportunity to record some at the Aquarium on the Bay in San Francisco, I took it! Sorry for the music, I was trying to merely mute the conversation you can hear otherwise... which is decidedly less-meditative. Enjoy!


Tuesday, November 8, 2011

Dictionaries are Fun!

One of my favorite pastimes is trying to determine the origins of an English word without having to look it up. Or I should more plainly state that I "guess". If I am motivated enough I'll go see if I am right.

Last night, whilst waiting for my 8 year old child to extricate himself from his bath, I pondered the origins of "pajamas". I am not kidding when I say that it is the next day and I was still plagued. I had no guesses. I could eliminate French, German... Latin... as any kind source of the derivation. Hmm... perhaps Greek? Finally the need to know got he better of me and I checked the online dictionary. Apparently it could be either Hindi or Persian! Who knew?

Here's what the dictionary said:
British, pyjamas
Origin: 1870-75; plural of pajama <Hindi, variant of payjama <Persian pay (leg) + jama (garment)

Cool huh? Learn something new every day!

It's Manly!

My next free pattern was a reply to a request for a "more manly" version of the Vegas Sands Cowl (*cough* Neckwarmer *cough*). It didn't take long to come up with a way to manage that... the stitch pattern lends itself very well to manipulation. So here you go, the Manly Collar.


Manly Collar (originally published Winter 2008)
Materials:
1 skein DK weight yarn (I used Knit Pick’s CotLin and at 123 yards I still had some left), get more if you are making a larger collar....
Size US7 needles (straight or circular but I found the circs easier to maneuver) or size required to get-gauge 
Tapestry needle
One Button (I think it was 5/8")


Gauge: approx 5 sts/inch in stockinette, approx 5.5 sts/inch in pattern

Finished size: about 6” wide by 19” long after blocking.

Pattern stitch (adapted from Grumperina’s Shifting Sands Scarf):
Worked over 5 stitches and 4 rows:
Row 1 (RS): *1/2LC, K2, repeat to end
Row 2 and 4: purl
Row 3: *k2, 1/2RC, rep to end


Pattern:
CO 105 sts loosely using whatever method you like to give you a nice-edge, I like to use the long-tail cast on because I can keep it nice and loose.

Knit four rows (garter stitch border), then purl one row (WS)
Row 1 (RS): K5, begin pattern stitch (above) and repeat until 5 stitches remain, K5.
Row 2 (and all WS rows except button hole row): K5, follow pattern to last 5 sts, K5
Row 3 (RS): K5, follow pattern stitch and repeat until 5 stitches remain, K5.
Next row add buttonhole (WS): K5, P2, bind off 3 sts, purl to last 5 sts, k5
Next row: K5, continue in pattern (row 1 again) to your bind-off gap, use backward-loop cast on to add 3 sts, k7.

Continue following pattern, keeping the 5-stitch garter stitch border on each edge, and the pattern stitch in the middle. When piece is approx 5” tall ending with a row 1 or 3, change to garter stitch again for four rows.

Bind off in your favorite manner.

Finishing: Block the collar and then weave in ends after it has dried. To sew on the button I folded the rectangle in half lengthways and wrapped the collar around my model’s neck, then placed a small pin (careful not to nick your model!) where the button hole is. Then I sewed the button on where the pin was. 


Abbreviations:
1/2LC: slip 1 st to cable needle and hold in front, k2, then knit 1 from cable needle
1/2RC: slip 2 sts to cable needle and hold in back, k1, then k2 from cable needle
Note: If you take the time to learn Grumerpina’s “Cabling without a cable needle” you will find it worth the time spent! Trust me! (http://www.grumperina.com/cables.htm)

If you would like to make this collar for a neck larger than 15", increase the number of cast-on sts by 5 for the number of inches you want to increase (i.e. if you want to increase to 16" increase by 5 sts). If you would like the collar to be a little taller, knit a few more pattern-rows before placing your button hole and add a few more rows to the end before working your final garter-stitch border.

*errata: There was an issue with the 5th row (first row after the garter edge) where I neglected to point out the 5 stitch garter edges!  So after knitting four rows, the next row: k5. p95, k5, then continue as instructed.